星期三, 5月 25, 2016

docker install on ubuntu 14.04


  1. 根據install guilde (https://docs.docker.com/linux/)安裝後

$ curl -fsSL https://get.docker.com/ | sh
要記得重開機,之後執行畫面如下:


表示執行成功。

2.下載container with nodejs and ffmpeg

docker pull dkarchmervue/fluent-ffmpeg
下載container, 由於docker的檔案架構是一層一層建上去的,所以會一層一層下載後建立image。如果有多個container引用相同image來建置,則可共用相同來源的layer,節省儲存空間。


docker run --rm -ti -v ${PWD}:/work dkarchmervue/fluent-ffmpeg node your-nodejs-script.js

參數說明:
--rm: container結束後,就移除所有container內的資料。 (預設情況下,container結束後,資料會存在container中,container預設空間為10G)
--ti: 產生虛擬tty,跟container互動
-v: 資料目錄映設,將主機的目錄與container中的mount point映射,此例為${PWD}目前工作目錄映射到container中的/work目錄,container中任何資料寫入/work目錄,實際上會寫回主機目前工作目錄。

$ docker run -p 127.0.0.1:80:8080 ubuntu bash

This binds port 8080 of the container to port 80 on 127.0.0.1 of the host machine. The Docker User Guide explains in detail how to manipulate ports in Docker.


VS Code的環境設定


要讓VS Code很好用,建議先進行下列環境設定

Node.js Applications with VS Code
https://code.visualstudio.com/Docs/runtimes/nodejs

把jsconfig.json及typescript安裝好後,就比較好用了。

星期三, 4月 13, 2016

ffmpeg gop 大小 x264 設定

http://superuser.com/questions/908280/what-is-the-correct-way-to-fix-keyframes-in-ffmpeg-for-dash


Method 1: with libx264's arguments
-c:v libx264 -x264opts keyint=GOPSIZE:min-keyint=GOPSIZE:scenecut=-1

#在壓x264時,有二個參數可以用來設定gop的大小,如果要設定成固定長度的gop,如每25個frame為一個GOP,則要把keyint 及 min-keyint設成同樣的值。
#在壓x264時,如果只設定keyint,則x264內定演算法scene_cut會偵測場景變化,選擇最有效率的I frame及GOP大小進行壓縮,此時,每個GOP的大小會是不定長度。
#scenecut=-1代表disable,則會採固定長度GOP進行壓縮,壓縮效率會比較差。

You should simply set the keyint and min-keyint to the same value and disable scene detection. If you don't disable scene detection, the "counter" will indeed be reset, and your keyframes end up at irregular intervals.
Note that I am not assuming variable framerate sequences here. I honestly have no idea how to deal with those in practice—I honestly haven't come across any before.
To give you an example, I converted a clip three times:
  • keyint=25 (i.e., scenecut enabled)
  • keyint=25:scenecut=-1
  • keyint=25:min-keyint=25:scenecut=-1
The frames are shown in the three columns:

As you can see, disabling scene cut detection and setting the keyframe interval is enough. It seems that even if you don't set a minimum, it'll insert keyframes at least at the interval specified by keyint. To be safe you should probably set min-keyint too.
I've researched this quite a bit a while ago—I'm currently involved in creating an ITU-T recommendation dealing with the analysis of DASH-type video transmission, so we had to figure out encoding settings that would be realistic, and from all of the documents and guides I've read, disabling scene cut detection and forcing the keyframe interval in x264 directly was the method of choice.
Thank you! This is great feedback. One question I have is how you generated that awesome table. I could totally use something like that. – Mark Gerolimatos Apr 30 '15 at 21:39
    
(There appears to be no way to write you directly) Can you please point me towards links to any threads in this ITU-T discussion? Thanks! – Mark Gerolimatos Apr 30 '15 at 21:45
1  
I just made that in Excel, pasting the output I got from three runs of ffprobe -i input.mp4 -select_streams v -show_frames -of csv -show_entries frame=pict_type, then coloring the cells. I'm afraid there are no public discussions, but I'll see if I can dig up some of the links I found back then. – slhck Apr 30 '15 at 22:01
    
Could you please re-try your experiment with the -force_key_frames expr:gte(t,n_forced*GOP_LEN_IN_SECONDS) form? I just tried it and found that while there were extra I frames in the stream, it DID seem to abide by my rule. A PERL program will follow as an "answer", as you cannot apparently use markup in comments. – Mark Gerolimatos May 1 '15 at 1:08
    
Interesting. I believe it's worth a separate "real" answer if you found out that it works. (Stack Exchange sites aren't really good for this discussion-style reply.) The last time I checked, -force_key_frames didn't work for me, and so I never tried it again. That was more than a year ago. Perhaps it was a bug. I'll try again soon. – slhck May 1 '15 at 8:00


up vote 2 down vote accepted
The answer therefore seems to be:
  • Method 1 is verified to work, but is libx264-specific, and comes at the cost of eliminating the very useful scenecut option in libx264.
  • Method 3 works as of the FFMPEG version of April 2015, but you should verify your results with with the script included at the bottom of this post, as the FFMPEG documentation is unclear as to the effect of the option. If it works, it is the superior of the two options.
  • DO NOT USE Method 2, -g appears to be deprecated. It neither appears to work, nor is it explicitly defined in the documentation, nor is found in the help, nor does it appear to be used in the code. Code inspection shows that the -g option is likely meant for MPEG-2 streams (there are even code stanzas referring to PAL and NTSC!).
Also:
  • Files generated with Method 3 may be slightly larger than Method 1, as interstitial I frames (keyframes) are allowed.
  • You should explicitly set the "-r" flag in both cases, even though Method 3 places an I frame at the next frameslot on or after the time specified. Failure to set the "-r" flag places you at the mercy of the source file, possibly with a variable frame rate. Incompatible DASH transitions may result.
  • Despite the warnings in the FFMPEG documentation, method 3 is NOT less efficient than others. In fact, tests show that it might be slightly MORE efficient than method 1.

Script for the -force_key_frames option

Here is a short PERL program I used to verify I-frame cadence based on the output of slhck's ffprobe suggestion. It seems to verify that the -force_key_frames method will also work, and has the added benefit of allowing for scenecut frames. I have absolutely no idea how FFMPEG makes this work, or if I just lucked out somehow because my streams happen to be well-conditioned.
In my case, I encoded at 30fps with an expected GOP size of 6 seconds, or 180 frames. I used 180 as the gopsize argument to this program verified an I frame at each multiple of 180, but setting it to 181 (or any other number not a multiple of 180) made it complain.
#!/usr/bin/perl
use strict;
my $gopsize = shift(@ARGV);
my $file = shift(@ARGV);
print "GOPSIZE = $gopsize\n";
my $linenum = 0;
my $expected = 0;
open my $pipe, "ffprobe -i $file -select_streams v -show_frames -of csv -show_entries frame=pict_type |"
        or die "Blah";
while (<$pipe>) {
  if ($linenum > $expected) {
    # Won't catch all the misses. But even one is good enough to fail.
    print "Missed IFrame at $expected\n";
    $expected = (int($linenum/$gopsize) + 1)*$gopsize;
  }
  if (m/,I\s*$/) {
    if ($linenum < $expected) {
      # Don't care term, just an extra I frame. Snore.
      #print "Free IFrame at $linenum\n";
    } else {
      #print "IFrame HIT at $expected\n";
      $expected += $gopsize;
    }
  }
  $linenum += 1;
}

星期二, 4月 12, 2016

ffprobe 觀察video frame使用方法

1. 觀察frame編號(coded_picture_number),資料大小(pkt_size),編碼類型IPB(pict_type), 播放時間順(pkt_pts_time), 解碼時間順(pkt_dts_time)

ffprobe -select_streams v:0 -show_entries frame=coded_picture_number,pkt_size,pict_type,pkt_pts_time,pkt_dts_time video.mp4 -of compact > result.txt

觀察結果
#檔案result.txt
frame|pkt_pts_time=0.000000|pkt_dts_time=0.000000|pkt_size=13695|pict_type=I|coded_picture_number=0
frame|pkt_pts_time=0.033367|pkt_dts_time=0.033367|pkt_size=630|pict_type=P|coded_picture_number=1
frame|pkt_pts_time=0.066733|pkt_dts_time=0.066733|pkt_size=827|pict_type=P|coded_picture_number=2
frame|pkt_pts_time=0.100100|pkt_dts_time=0.100100|pkt_size=1832|pict_type=P|coded_picture_number=3
frame|pkt_pts_time=0.133467|pkt_dts_time=0.133467|pkt_size=367|pict_type=P|coded_picture_number=4
frame|pkt_pts_time=0.166833|pkt_dts_time=0.166833|pkt_size=1544|pict_type=P|coded_picture_number=5


2. 找出所有I畫面幀
cat result.txt | grep 'type=I'

觀察結果
frame|pkt_pts_time=0.000000|pkt_dts_time=0.000000|pkt_size=13695|pict_type=I|cod
ed_picture_number=0
frame|pkt_pts_time=2.002000|pkt_dts_time=2.002000|pkt_size=17793|pict_type=I|cod
ed_picture_number=60
frame|pkt_pts_time=3.636967|pkt_dts_time=3.636967|pkt_size=15824|pict_type=I|cod
ed_picture_number=109
frame|pkt_pts_time=5.638967|pkt_dts_time=5.638967|pkt_size=15158|pict_type=I|cod
ed_picture_number=169
frame|pkt_pts_time=7.640967|pkt_dts_time=7.640967|pkt_size=11380|pict_type=I|cod
ed_picture_number=229
frame|pkt_pts_time=9.642967|pkt_dts_time=9.642967|pkt_size=16336|pict_type=I|cod
ed_picture_number=289


星期一, 3月 28, 2016

User Story Good Articles

用户故事驱动的敏捷开发 – 1. 规划篇
http://devopshub.cn/2016/02/28/user-story-driven-agile-development-1-planning/


http://geek.csdn.net/news/detail/63625


http://devopshub.cn/2016/01/10/user-story-mapping-for-the-first-time/
http://devopshub.cn/2016/01/11/how-to-create-user-story-mapping/

星期六, 3月 26, 2016

在ubutnu 14.04安裝ffmpeg


http://www.faqforge.com/linux/how-to-install-ffmpeg-on-ubuntu-14-04/

sudo add-apt-repository ppa:mc3man/trusty-media

sudo apt-get update
sudo apt-get dist-upgrade
 
sudo apt-get install ffmpeg

Why redirect output to 2>&1 and 1>&2?

 Why redirect output to 2>&1 and 1>&2?

http://superuser.com/questions/436586/why-redirect-output-to-21-and-12

簡單的說,就是把stderr(2) 轉向到stdout(1), 讓一些命令可以進一步處理,例如grep就只能讀stdout的資料,如果我們想處理stderr的結果,就要2>&1

另外一種情況是想把stderr的錯誤也記錄下來到同一檔案, 可以一樣的做法。

ns2 codelite debug gdb ubutnu 14.04 Setting

  1. Create Project using Project Wizard, and then select custom Makefile since we already have one in ns-2.35 directory
  2. Go to project setting to set the working directory


  • Remember to modify Makefile add -g setting for debug


  •  Enable gdb debug, then you can add breakpoint like visual studio.


  • Remember to right click the project, and select to "Import File(Directorys)...", in the filter, remember to add "*.cc;*.tcl" to add cc and tcl scripts  
ref: gcc setting in ubuntu 14.04, I have setting to gcc-4.4 and g++4.4, you need to do yourself

http://stackoverflow.com/questions/7832892/how-to-change-the-default-gcc-compiler-in-ubuntu/7834049#7834049 

http://stackoverflow.com/questions/14997275/gdb-and-ns2-how-to-stop-program-at-some-function-call

星期三, 2月 17, 2016

H.264 SPS, PPS, Slice, MB主要資訊

SPS(Sequence Parameter Set)主要描述影片串流的資訊,此外也包含vui的資訊:

  • profile_idc: 代表視訊所用的H264 Profile,如 Base, Extension, High Profile。codec會根據profile來初始化一些參數。
  • pic_order_cnt_type: 代表計算圖片顯示順序(Picture Order Count, POC)所採用的方式 (POC Type)。大部分為零。
  • log2_max_frame_num_minus4: 代表畫面幀的最大數字((值+4)*2)。在解碼時,會有緩衝區用來儲存I, P參考幀,該緩衝區會重覆使用。每個畫面幀在解碼時會有一個frame_num數字,代表該畫面於解碼緩衝區id。
  • pic_width_in_mbs_minu1: 畫面幀的寛度,以microblock為單位。
  • pic_height_in_map_units_minus1: 畫面幀的高度,以map unit為單位?。
  • direct_8x8_inference_flag: 描述mv預測方式。
  • vui:
    • num_units_in_tick: 時間單位
    • time_scale: 每個時間單位播幾張畫面

PPS(Picture Parameter Set)主要描述畫面幀(或field場)資訊:
  • pic_parameter_set_id: PPS的id,在一個影片中會有很多畫面幀或片段(Slice),這些畫面片段會參考PPS的設定進行編解碼。
  • seq_parameter_set_id: 目前PPS所參考到的SPS id。
  • entropy_coding_mode_flag: 畫面幀壓縮方法,如1代表CABAC。


Slice Header:
  • first_mb_in_slice: 第一個mb在slice中的位置,通常為0。
  • slice_type: Slice的類型,如 I, P, B frame/slice
  • frame_num: 在緩衝區的frame id

MicroBlock:


星期二, 2月 16, 2016

CodeLite使用補充


  • 安裝cscope
https://github.com/eranif/codelite/issues/795

  • 假如程式碼不需要build只想要查尋原始source code,則可匯入舊的程式碼,如library。(忽略custom build, 如果是用msys2等,直接打開shell 在msys2下make編譯library就好,不要再codelite中設定)。


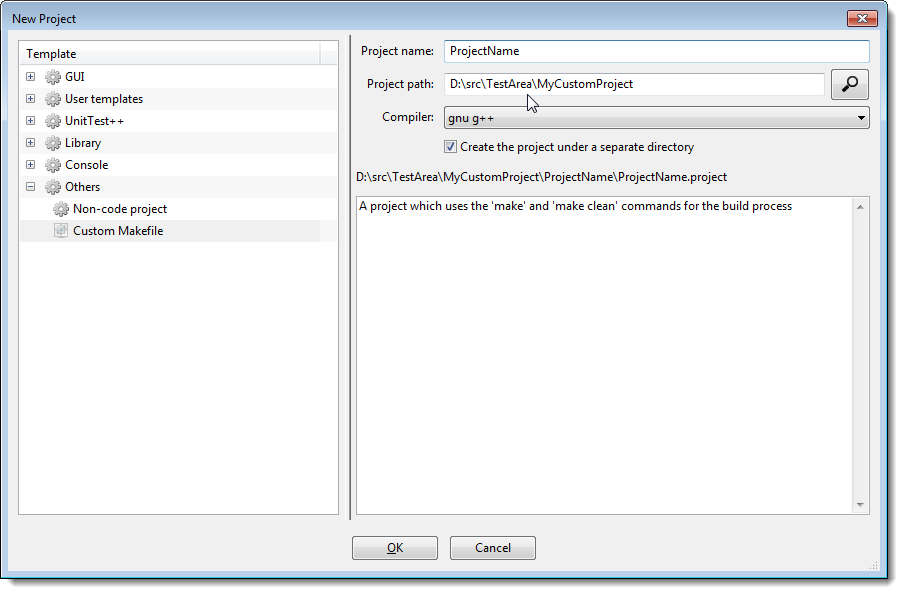
假設舊的程式碼在 D:\TestArea\MyCustomProject and uses makefile for the build process.
The fastest way to import this project into CodeLite is:
  • Create a new project Workspace -> Create New Project give it any name and place it under D:\TestArea\MyCustomProject ( you can check the option 'create the project under a separate directory' )
  • Right-click on the project, and select Import Files From Directory. The import dialog will pop up; accept its defaults and click OK. (匯入不會把檔案複製一遍,原檔案還是會留在原來的地方)
  • Once the import process completes, you can expand the tree to the left, where you should see all source files imported from the disk.
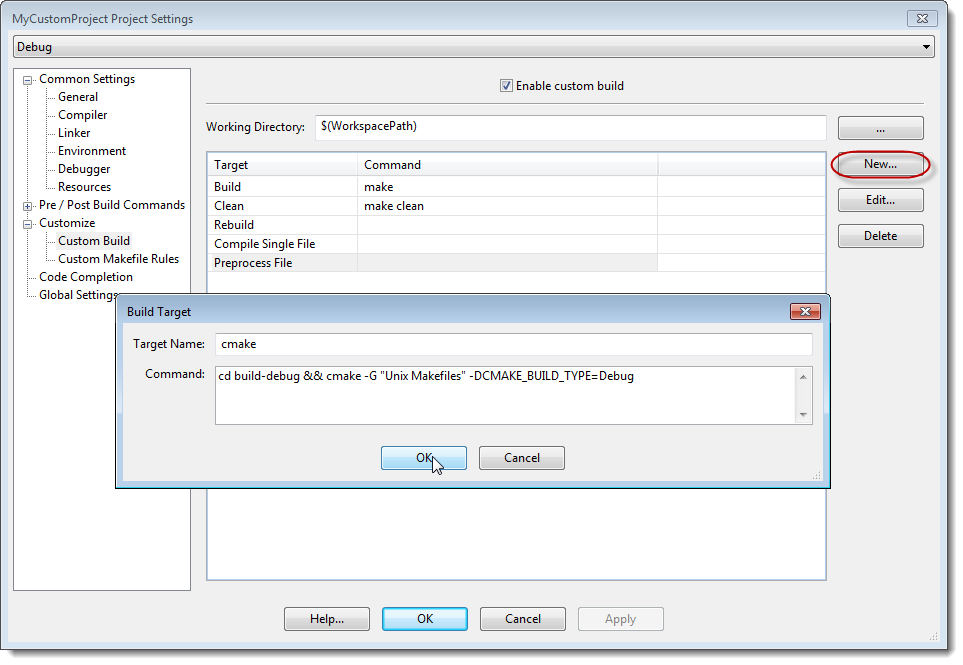
  • You can add / delete any targets from the Project Settings -> Customize >Custom Build , the below screenshot shows how to add a cmake target
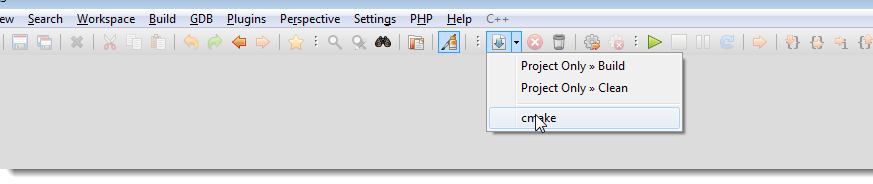
You can access all the targets from the menu bar as shown below or by right clicking on the project and select Custom Build Targets

ffmpeg parser libx264資料


  • FFMPEG结构体分析:AVFormatContext

http://blog.csdn.net/leixiaohua1020/article/details/14214705
  • 使用FFMPEG类库分离出多媒体文件中的H.264码流

http://blog.csdn.net/leixiaohua1020/article/details/11800877

  • FFmpeg的H.264解码器源代码简单分析:解析器(Parser)部分

http://blog.csdn.net/leixiaohua1020/article/details/45001033


  •  最简单的视频编码器:基于libx264(编码YUV为H.264)

http://blog.csdn.net/leixiaohua1020/article/details/42078645


  • 下載x264 程式碼

  1. git clone git://git.videolan.org/x264.git  
YASM Setup
Download YASM executable from ​http://yasm.tortall.net/Download.html. You have to download the "general use" binaries and NOT the ones for VS2010. Either Win32 or Win64 binaries support outputting object files for both architectures so that should not matter. The last tested version was yasm-1.3.0-win64.exe.
Rename the downloaded executable to yasm.exe and place it in your MSYS2 path. E.g.C:\msys64\usr\bin\yasm.exe.
  • 到codelite設定一下路徑


  •  問題: codelite中,debugger有時候會不work,到設定中修改automatically set...就可以除錯


  • 問題: 在編譯完後執行後產生不出來h264檔案,x264_encoder_encode函式傳回值為0, pNals, iNal值也為0,原因為多執行緒 delay encode的問題,如下:
http://blog.sina.com.cn/s/blog_51396f890102f061.html
到程式39行,新增一行
  pParam->i_threads  = 1;
強制thread為1就解決delay encode的問題,但是效能會比較差。

星期一, 2月 15, 2016

NALU h.264 相關資料

Concept:


  • Exploring H.264. Part 2: H.264 Bitstream format

http://gentlelogic.blogspot.tw/2011/11/exploring-h264-part-2-h264-bitstream.html


一步一步解析H.264码流的NALU(SPS,PSS,IDR)

http://guoh.org/lifelog/2013/10/h-264-bit-stream-sps-pps-idr-nalu/


  • 解讀h264 SPS的參考資料

The h.264 Sequence Parameter Set
https://cardinalpeak.com/blog/the-h-264-sequence-parameter-set/


  • IDR介紹

http://www.programgo.com/article/73452314422/


  • 如何区分H.264视频流的I frame 和 P frame

http://www.yaosansi.com/post/how-to-distinguish-between-I-frame-and-P-frame-H264-video-streams/


  •  x264命令行參數解釋

https://www.ptt.cc/bbs/AVEncode/M.1305719689.A.615.html


  • tool to extract H.264 frame size vector

http://forum.doom9.org/showthread.php?t=149122

  • ffprobe showframes 再結合awk或其它工具,就可以抓frame的資訊
http://superuser.com/questions/885452/extracting-the-index-of-key-frames-from-a-video-using-ffmpeg
https://trac.ffmpeg.org/wiki/FFprobeTips 

YUV檔案格式

【视频处理】YUV格式说明
http://www.cnblogs.com/xmphoenix/p/4508483.html

MSVC 使用linux C Library的方法

Microsoft Visual C++可以使用linux 有source code 的函式庫,如libjpeg等,方法如下:

  • 利用mingw 編譯liunx library,產生.a 及dll
  • 利用gcc 產生def檔, e.g., 
gcc -shared -o your_dll.dll your_dll_src.c -Wl,--output-def,your_dll.def
  • 利用MSVC的工具lib.exe ,結合dll及.def 檔轉換成.lib檔,之後就可以在vc內使用
lib /def:your_dll.def

Note: 只能轉換C library,不能轉換C++ Library,因為gcc 跟 msvc在處理C++ Library的方式不相容,所以只能轉換C 函式庫 

如何在vc內使用c lib?
例子:
extern "C" {
include "openssl.h"
}


Reference:
  • How to use libraries compiled with MingW in MSVC?
http://stackoverflow.com/questions/2529770/how-to-use-libraries-compiled-with-mingw-in-msvc

Mingw 64及codelite安裝

[更新,簡易安裝方法,直接下載codelite進行安裝。第一次安裝時會提示是否要安裝gcc,這時選擇tdm-gcc 64下載及安裝後,再回到codelite掃描環境,就會把相關參數一次設定好,不用像下文要手動設定 (但是codecomplete 還是要自己設定一下,比較好用。]

mingw 是最小化的gun tools for windows開發環境
msys 是最小化的linux shell,處理一些環境變數,基於cygwin

從source forge 安裝 mingw 64的installer 會有問題,所以參考下列網站,先安裝msys2,再由msys2的套件管理程式安裝mingw-64

1. 如何在 Windows 上面使用 gcc 進行 C/C++ 程式開發
https://www.gitbook.com/book/shaochien/how-to-use-gcc-to-develop-c-cpp-on-windows/details


  • Update the system packages with (Arch-Linux 的 pacman 套件管理程式,跟yum, apt類似的套件管理程式)

pacman --needed -Sy bash pacman pacman-mirrors msys2-runtime

  • 關掉 MSYS2, 再執行一遍( run it again from Start menu and update the rest with)

pacman -Su

  • 安裝git
pacman -S git

  •  用套件管理程式安裝 GCC

pacman -S mingw-w64-i686-gcc
pacman -S mingw-w64-x86_64-gcc
pacman -S gcc

  • 使用 gcc -v 來檢查是否安裝成功 
  • 安裝gdb
    pacman -S gdb

    • 安裝make

     pacman -S make


    2. 安裝開發工具codelite
    http://codelite.org/

    • 設定codelite及mingw 64 gcc compiler,到 build選單


    • 補充設定make及gdb路徑 
    • 設定codecompletion路徑,寫程式才會自動找到function, class自動補上


    • 建新專案,測試及執行


    星期五, 12月 25, 2015

    Linux 各種平台架站安裝資料

    http://www.server-world.info/en/

    星期三, 12月 16, 2015

    word vba

    Sub ListUsedBookmark()
    '
    ' ListNotUsedBookmark 巨集
    '
    '
    Dim oField As Field
    Dim sCode As String
    Dim bFoundOne As String

    For Each oField In ActiveDocument.Fields


        If oField.Type = wdFieldSequence Then

            sCode = oField.Code

    '        If InStr(sCode, "ref") <> 0 Then
     '           If oField.Result.Text = "57" Then
      '              Debug.Print oField.Result.Text
       '         End If
        '    End If
        End If
        '找出有cite到的reference
        If oField.Type = wdFieldRef Then
            sCode = oField.Code
            If InStr(sCode, "REF") <> 0 Then
                 Debug.Print oField.Result.Text
            End If
        End If

    Next

    End Sub

    星期六, 11月 28, 2015

    CSS Learning & Tricks


    Font: Google Open Font
    Icon: Font Awesome
    Image: 影像超過container 寬度,可設定max-width: 100%,這樣就不會超過父親容器大小。
    Mail: 可以使用第三方